How to: One-Step Buttonholing.
Before you start, remember:
. Always make a practice buttonhole on a sample of your fabric.
. Make buttonhole position on fabric as indicated in pattern.
Recommended Settings:
Stitch Selection: Buttonhole Stitch
Stitch Width:
Stitch Length: 4″
Foot: Buttonhole Foot
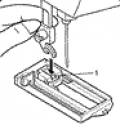
1. Fastening Buttonholing Presser Foot. Remove presser foot from shank.
2. Center pin (1) in presser foot under shank.
3. Press presser foot screw down firmly until shank snaps into place.
4. Set the Length of the Buttonhole. Pull buttonhole lever (2) straight down as far as it will go. Press it toward you. Place button against lever (2) and slide clamp (3) back until it touches.
5. Center red guidelines (4) of foot around beginning line. Lower presser foot.
6. Start running machine. The entire buttonhole will be sewn in one operation. Start sewing when leg begins overlapping bartack.
7. Remove fabric from machine
8. Clip threads end; cut buttonhole opening with scissors or seam ripper. Push buttonhole lever (2) back up into machine.
9. Adjust the Balance of the Buttonhole. If two stitching sides of a buttonhole are unequal, move stitch balance lever to adjust. If right side is too open, move stitch balance lever slightly to right. If left side is too open, move stitch balance lever slightly to left.
| Weight | 0.00000000 kg |
|---|---|
| Dimensions | 0.00000000 × 0.00000000 × 0.00000000 cm |


